| ||||||||||||||||||||
 | ||||||||||||||||||||
 | ||||||||||||||||||||
 | ||||||||||||||||||||
Sunday, 16 March 2014
Transform your Windows 8 PC into touch PC


Saturday, 15 March 2014
Windows 8 Touch Gestures
Windows 8 gestures explained: how to control your Windows 8 PC with touch
TUTORIAL We show you how to get touch control over your new Windows 8 PC

Windows 8 comes packing a new interface built specifically for touchscreens, but you can use it with or without.
Read our guide below to see how you can get to grips with the new OS, even if you're still using a mouse and keyboard.
1. Select or perform an action

Tapping something causes an action, such as launching an app or following a link. Tap your apps to fire them into life.
Using a mouse? Click an item in the Start screen to perform an action such as opening an app.
2. App-specific commands

App commands are revealed by swiping from the bottom or top edge of the screen.
Using a mouse? Right-click anywhere to see commands, which will depend on the specific app.
3. Get more options

You can see details when you press and hold. In some cases, pressing and holding opens a menu with more options.
Using a mouse? Point to an item and hover the mouse for a couple of seconds to see more options.
4. Drag and move items

This is mostly used to pan or scroll through lists and pages, but you can use it for other interactions, too.
Using a mouse? Click, hold and drag to pan or scroll and you'll be able to move items, releasing the button to drop it.
5. Find recently used apps

Swiping in and back out on the left brings up the most recently used apps and you can select an app from that list.
Using a mouse? Place the mouse in the top left and slide down the left side of the screen to see recently used apps.
6. Close an application

Unused apps don't affect your performance, but if you want to close one anyway, just drag the app to the bottom of the screen.
Using a mouse? Click the top of the app and drag it to the bottom of the screen.
7. Zoom in and out

You can start zooming by pinching or stretching two fingers on the screen to enlarge or reduce the size.
Using a mouse? Hold down the [Ctrl] key while using the mouse wheel. Alternatively, click the minus symbol in the bottom right.
8. Settings commands and search

Swipe from the right side to reveal the Charms with system commands such as search, settings and sharing options.
Using a mouse? Place the mouse in the upper or lower right corner of the screen and move your mouse up the right edge.
9. Turn and pivot items

Hold two or more fingers on an object and rotate. You can turn the whole screen 90 degrees when you rotate your device.
Using a mouse? Support for rotating an object depends on the specific app.
10. Switch between apps

Swiping from the left reveals thumbnails of your open apps so you can switch to them quickly.
Using a mouse? Place the mouse pointer in the upper-left and click to cycle through apps.
Android on PC

It used to be the case that PC users had the choice of installing Windows or, if they were feeling adventurous, a version of Linux. This is still true, but it is now also possible to install OS X without owning a Mac and virtualization means that you can do all of this alongside your main operating system in a virtual computer.
This being Android.AppStorm, you may well wonder what virtualization has to do with your phone or tablet. Well, how would you feel about the chance of installing and running Android on your PC? Using a free copy of VirtualBox and the information in this guide, you can run a fully functioning – and legal – version of Jelly Bean on your computer.
If the below process doesn’t work for you, please check this other (simpler) method to emulate Android on your PC with GenyMotion.
It’s a Simple Process
First, you’ll need to grab yourself a copy of VirtualBox. This powerful virtualization utility can be used to install a second operating system alongside your primary one, and while this usually means running a second copy of Windows or trying out Ubuntu, there’s no reason why you shouldn’t be able install a mobile operating system as well.

Android may have been designed for your phone and tablet , but that doesn’t mean it needs to stay there.
Once you have the virtualization software up and running, you’ll need to get hold of a copy of Jelly Bean to install. This does not mean that you need to obtain an illicit copy of the operating system from an untrustworthy website, or rip a copy of your phone’s ROM – it is actually freely available.
Step 1: Grab an Android ROM
There are various versions of Android available for download, but it makes sense to work with the most recent version – Jelly Bean. Head over to the Android-x86 website scroll down to the Android-x86-4.2-devel section and click the View link for the most up to date version (at time of writing this is 4.2 20130228).

There are several Android ROMs available to download including the latest version of Jelly Bean.
Weighing in at just under 200MB, the download will take a moment to transfer. Once you have the ISO file on your hard drive, you’re ready to set about the task of installing it in VirtualBox.
Step 2: Going Virtual
Pay a visit to the VirtualBox download page and click the link to download the software. Here, I’m working with Windows 8, but VirtualBox is compatible with older versions of Microsoft’s operating system, and there are also versions available for OS X and Linux.

VirtualBox can be used to install a second operating system on your computer, including Android.
Once downloaded, run through the installation of the program – just accept all of the default options. Don’t be concerned when you’re asked to install a new network adaptor as this is part if the usual installation process.

A virtual network adaptor will be installed by VirtualBox to allow virtual machines to get online.
Once installation is complete, launch VirtualBox and you’re ready to move to the next stage.
Step 3: Create a Virtual Machine
You’ll need to start by creating a new virtual machine onto which you will install Android. Click the New button. Name the virtual machine whatever you like, and (as Android is based on Linux) select Linux from the first drop down menu. From theVersion menu select Other Linux and then click Next.

Android is a Linux-based operating system and it needs to be correctly identified in VirtualBox.
Move the memory slider to the right so that 512MB or more of RAM is set aside for VirtualBox and click Next. Make sure that the Create a virtual hard drive now option is selected and click Create. Select VDI, click Next and then select theFixed size option before clicking Next.
You can then use the slider to choose how large a disk should be assigned to the virtual machine, and you can use the folder button to choose where it should be stored. Click Create when you’ve configured your settings — it might take a few minutes for the virtual disk to be created.

Your virtual Android device can be assigned a drive capacity of your choice — go wild!
Step 4: Install Android
Make sure that you have your newly created virtual machine selected and then click the Settings button in the toolbar. Click the Storage link to the left hand side of the dialog and then towards the center click the Empty entry in the Storage Treesection.
To the right of this, click the small disc button and select Choose a virtual CD/DVD disk file from the menu that appears. Navigate to the ISO file you have downloaded, select it and click Open followed by OK.

The ISO files you’ve downloaded can be used as a virtual CD to install Android.
Power up your virtual machine by clicking the Start button in the VirtualBox toolbar.
If this is the first time you’ve used the program you may see a message letting you know about mouse capturing. When you move the mouse cursor inside the virtual machine window you’ll find that you cannot move it back out to control Windows as you normally would – just remember to press the right hand Ctrl key to free up the mouse when you need to.
Use the arrow keys on your keyboard to scroll down to the Installation option and press Enter.

Android can be run without installation, but opting to install provides a better, faster experience.
Now you will need to configure the virtual hard drive so that there is somewhere to install Android to. Select the Create/Modify Partition option and press Enter.
Select New at the bottom of the screen and press Enter, and then select thePrimary option before pressing Enter again. Press Enter to create a partition that occupies your entire virtual drive.

Configuring hard drives for Android may seem complex, but it takes just a few moments.
Now select the Bootable option and press Enter, select Write and press Enter, and then type the word yes before pressing Enter once again. Select Quit, choose the partition you’ve just created and press Enter.
When prompted, select the option to use the ext3 file system and select Yes to confirm your choice. The GRUB bootloader takes care of launching Android, so select Yes to install it and then select Yes again to make the /system directory writeable.

The correct drive format must be selected for Android to work properly, so take care during configuration.
It won’t be long before Android boots, and at this point you should remove the virtual CD from the drive. Click the Devices menu and select CD/DVD Devicesfollowed by Remove disk from virtual drive.

It’s a slightly time-consuming process, but getting Android on your PC is very rewarding.
Step 5: Almost There!
You might find that Android takes a little while to boot up — at least the first time around — and you’ll then have to run through the initial configuration just like you did the first time you switched on your phone or tablet.
Should you find that your mouse does not work and you are unable to click within Android, click the Machine menu in Virtual Box and then click Disable Mouse Integration. You may also find it useful to click View followed by Switch to Scale Mode if you find the mouse acts erratically — you can switch back to regular mode by pressing the right Ctrl key and C at the same time.

The first time you run Android you’ll have to set it up just like you did on your phone or tablet.
You can ignore any steps related to connecting to a wireless network as VirtualBox will just make use of your computer connection without the need for additional configuration.

Running Android within Windows can feel strange to start with, but it’s also great fun!
Now it’s time to pay a visit to Google Play and start downloading apps! Let us know how you get on, particularly if you think up any interesting uses for a virtualized copy of Android.
Control Your PC using the Android Device
Microsoft Remote Desktop arrives on Google Play, lets you control your PC from your Android device
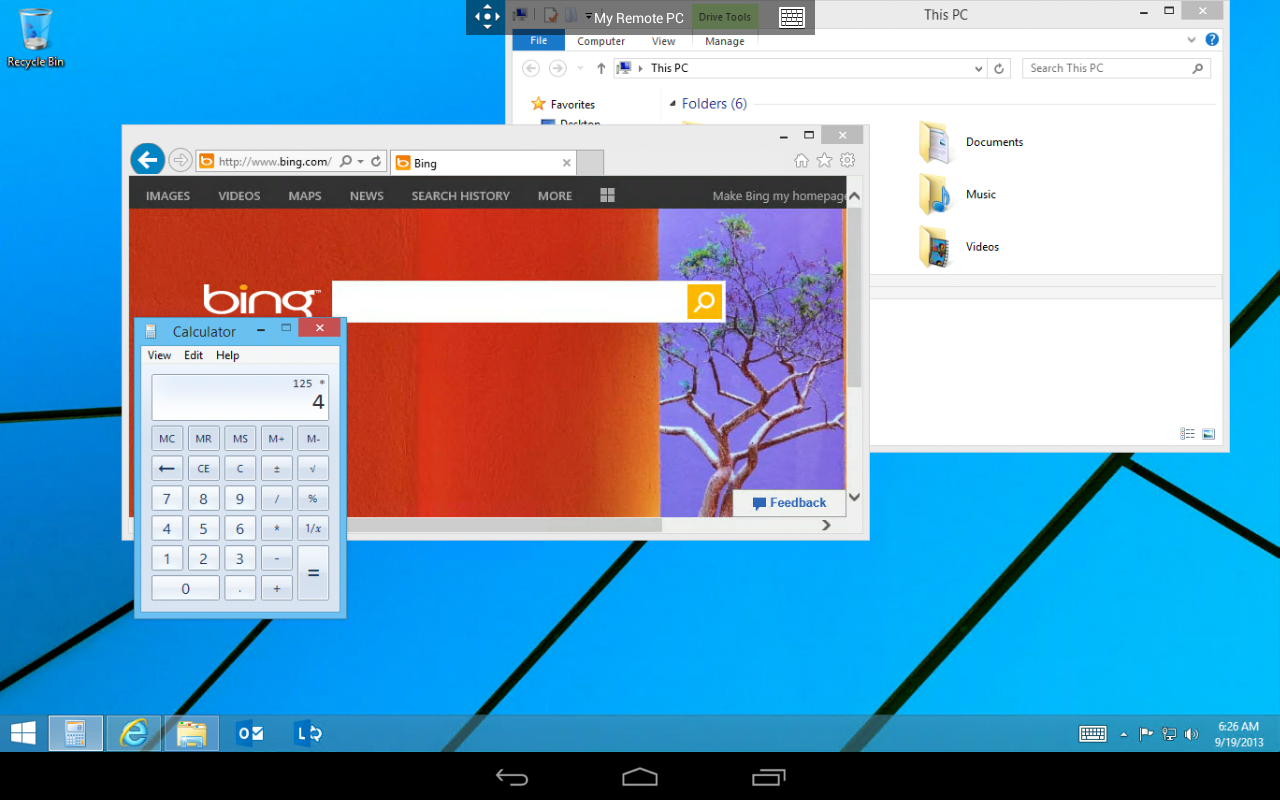
Windows 8.1 went live this afternoon and if you had any luck downloading it (servers were getting pounded earlier today), you might want to check out Microsoft Remote Desktop, Microsoft’s latest app to hit the Google Play Store.
As the name suggests, Microsoft Remote Desktop allows Android users to control their Windows PC using their smartphone or tablet because, let’s face it, nobody really owns a Windows Phone device. Android users use multi-touch gestures to navigate around their desktops, enter text by clicking on text fields and use the familiar Android keyboard to type, and it’s even possible to stream “high quality video” complete with sound.
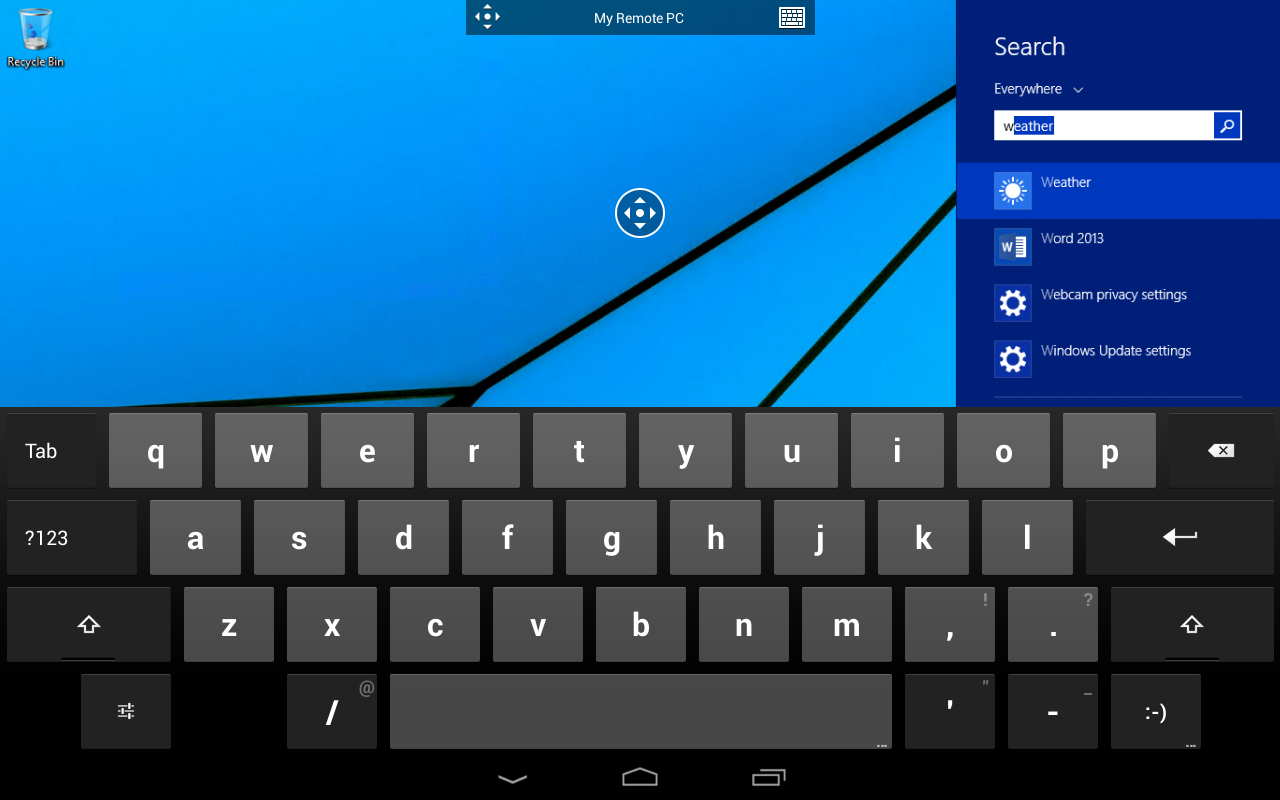
RemoteFX is the Microsoft’s technology making everything possible, and if you guys want to check out the app for yourselves, download the app by visiting the link below.
[Microsoft Remote Desktop on Google Play]
How to Supercharge Your PC With a RAM Disk
How to Supercharge Your PC With a RAM Disk

What is a RAM disk? The name says it all: A RAM disk is a virtual hard drive stored in your computer's RAM. Creating a RAM disk requires dedicated software and utilizes a chunk of your system's available memory; though a RAM disk appears as just another drive on your PC, the RAM that you use for the RAM disk is unavailable for general memory tasks.

Why would you want to use memory as a makeshift hard drive? Speed, pure and simple. RAM is insanely fast compared with traditional storage, as you can see in the above screenshot comparing benchmarks from a 7200-rpm hard drive (left) and a RAM disk created with Dataram's RAMDisk utility (right).
Setting Up a RAM Disk: Pros and Cons
RAM disk read/write speeds blow away the speeds of even top-of-the-line SSDs. That makes a RAM disk a wonderful tool for hastening operations in which your machine must read and write a lot of data, such as media encoding or editing large batches of photos.
The biggest everyday performance gains occur when you fully install a program on a RAM disk. For example, moving Word, Excel, Firefox, and Acrobat off of my laptop's 7200-rpm hard drive and onto a RAM disk resulted in the apps' loading nearly twice as quickly, rivaling the opening speeds on an SSD—especially when opening large files.
Games run more smoothly from a RAM disk too, although coaxing Steam titles into working with a RAM disk is a bit of a hassle, and storing a whole game in a virtual drive requires a big chunk of memory.
Of course, running important programs from a RAM disk has some notable disadvantages, too. The storage capacity is severely limited in comparison with that of a standard hard drive, and the inherent volatility of random access memory can be a headache if you store important files or programs on your RAM disk. Size limitations are a significant drawback: The size of the virtual drive is constrained by your system's total RAM, and you'll want to leave at least 4GB of memory untapped and available for general computer use (more is recommended). That means most people won't be able to set up a RAM disk that's larger than 4GB.
Since RAM disks are volatile, they lose their data every time the PC loses power. Most RAM-disk utilities bypass this problem by including an optional feature that automatically saves the contents of your RAM disk to a hard drive during shutdown, and then reloads the data to the RAM disk during startup. This arrangement works well (unless you suddenly lose power), but it adds considerable length to the PC's startup and shutdown times, especially if you're running a large RAM disk on a traditional hard drive. A 4GB RAM-disk image, for example, takes several minutes to copy to a 7200-rpm hard drive. (SSDs save data much faster.)
If that sours things for you, give the free trial of Primo Ramdisk disk a whirl. The program includes a Quick Save feature that updates your existing disk image and saves only new or altered data. Most utilities save the entire RAM-disk image every time your PC shuts down, which is what takes so long. If you decide that you like Primo Ramdisk, a personal license for two PCs will set you back $30.
How to Create a RAM Disk
For the purposes of this guide, I chose Dataram's RAMDisk, because the personal version is free for RAM disks up to 4GB in size. If you need more space, the full version is $19. That's cheaper than most RAM-disk software, but Primo Ramdisk and other more expensive premium options deliver more robust features. The free utility ImDisk is the only way to fly if you want to make a RAM disk that's larger than 4GB, but I don't recommend it as heartily: The command-line interface is more of a hassle, and ImDisk's virtual drives aren't as fast as the ones that other RAM-disk software packages create.
Download and install Dataram's software, and then launch the RAMDisk Configuration Utility. In the main settings screen, select the Unformatted disk-type option and enter a size for the RAM disk in megabytes (1GB equals 1024MB). Note the 4092MB limit in the free version.

Next, go to the Load and Save tab. If you want the software to save your RAM-disk data to a traditional hard drive when you shut down the computer, check the Save Disk Image on Shutdown option and choose a location for saving the disk image. Likewise, check theLoad Disk Image at Startup option and make sure it's pointed to the same location if you want the software to reload your saved data to the RAM disk automatically when you boot the computer.
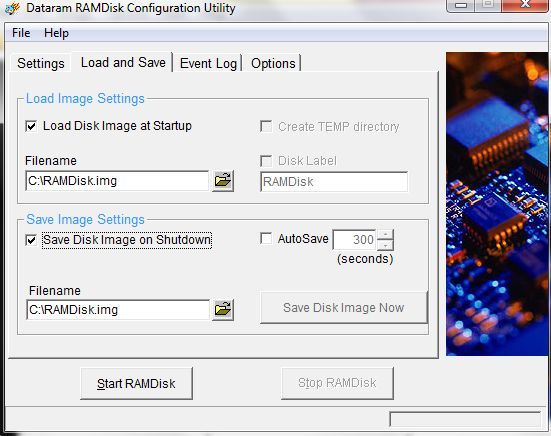
Remember that doing so can add a significant amount of time to your PC's startup and shutdown; if you don't plan on using your RAM disk often or for critical saves, consider leaving those options unchecked. The RAM disk will be wiped every time your PC powers down, but if you're storing only temporary files on it, that's hardly a major loss.
Alternatively, if you want to store apps on the RAM disk but keep their output—such as documents or game saves—on a traditional drive, you can save time by loading the disk image at startup but disabling the 'Save at shutdown' option. Just manually save the disk image whenever you add or update an app.
After selecting your save/load options, you're good to go. Click Start RAMDisk and install the Dataram driver when prompted. The program will warn you that the image file load failed; don't sweat it. Now you need to format the disk.
Formatting the RAM Disk
Here's where things diverge a bit. For some users, the new drive instantly appears in Windows Explorer (alongside the C: drive), and formatting it is as easy as right-clicking the RAM-disk drive and selecting Format to bring up a box of options. Leave the allocation capacity as is, change the file system to NTFS, check the Quick Format option, name the volume whatever you like, and click Start.
Unfortunately, things aren't always so simple. Sometimes, the drive won't appear in Windows Explorer automatically, and you'll have to allocate the space and start the formatting process manually.
If that happens to you, open the Start menu, right-click Computer, and select Manage. The Computer Management window will open. In the left pane, click Disk Management in the Storage options. Now, look for the 'Unknown' disk at the bottom of the central window; it should have a black bar next to it, with the size of the RAM disk and the word 'Unallocated' underneath the bar.

Right-click the unknown disk and initialize it, leaving the MBR option checked. The disk's designation should change from 'Unknown' to 'Basic'. Next, right-click the black bar and select New Simple Volume. Follow the steps in the wizard that appears, and when you're prompted with the formatting options, use the details described previously. Give it any drive letter designation you want. (I like to use R: for mine.)
Now you have a working RAM disk. You can find it in Windows Explorer the same way you would any other drive. But what are you going to do with it?
Moving Browser Caches to the RAM Disk
Many people use RAM disks to store their temporary Internet files, since a RAM disk's volatile nature wipes the data when the computer shuts down. (Unless you're automatically saving the disk image, of course.) Some users say that storing files on a RAM disk speeds up browsing, too, but I've never noticed a significant performance gain; if nothing else, moving your caches to RAM keeps needless writes off of your SSDs.
Here's a more detailed explanation of how to move the caches of the big three browsers.
Internet Explorer: Microsoft keeps things fairly simple. Go to Tools > Internet Options > General, and then click the Settings button in the Browsing History portion. In the window that pops up, you'll see a Move Folder button in the Temporary Internet Files section. Click it, and then point IE toward a cache folder on your RAM disk.
Firefox: You can't change how Firefox stores its cache without tinkering with the browser's configuration. Type about:config in the address bar, press Enter, and click through the warning. Right-click anywhere on the Preferences list, and then select New String. Enter browser.cache.disk.parent_directory (note the underscore between "parent" and "directory") as the Preference name, and then list the file path to your RAM disk as the string value. (In my case, I would use R:\ as the value.)

A Cache folder containing Firefox's temporary files will appear in your RAM disk.
Chrome: Since Chrome won't let you change the location of temporary Internet files, you'll have to change the way Windows handles the program. It's not as difficult as it sounds.
Right-click Chrome in the Start menu, and select Properties. In the Target: box, you'll see Chrome's file path, which ends in 'chrome.exe'. Place your cursor at the end of the path, press your keyboard's spacebar once—that's important—and then paste or type the following text:
--user-data-dir="your folder path"
Replace "your folder path" with the path to a cache folder on your RAM disk, but leave the quotation marks intact. Here's an example of how the full Target box should look afterward:
C:\Users\Brad\AppData\Local\Google\Chrome\Application\chrome.exe --user-data-dir="R:\ChromeCache"Use HDD memory as RAM in Windows 7/Vista
HOW TO USE HARD DISK FREE SPACE AS VIRTUAL RAM
If your computer is working slow due to low RAM and you don’t want to upgrade your PC for any reason, here is a solution for you. You can use your Hard Disk free space as Virtual RAM. You can create pagefile to Use hard disk free space as Virtual RAM. A paging file is an area on the hard disk that Windows uses as if it were RAM. Follow the steps given below to use your Hard Disk Free Space as Virtual RAM.
For Windows 7/Vista:
1) Right Click on “Computer” icon on desktop, then click “Properties”.
2) Click “Advance system settings”.
3) Click on “Advanced” tab, then click on “Settings” in performance section.
4) Click on “Advanced” tab, then click on “Change” in Virtual memory section. Now you should see the following screen.

5) Select the drive, then select Custom size, insert Initial and Maximum size, then click “Set”, now Click “OK”.
For Windows XP:
1) Right click on “My Computer”, then click on “Properties”.
2) Click on “Advanced” tab, then Click on “Settings” in Performance section.
3) Click on “Advanced” tab, then Click on “Change” in Virtual memory section.
4) Select the drive, then select Custom size, insert Initial and Maximum size, then click “Set”, now Click “OK”.
* Recommended size of Pagefile is Your RAM * 1.5 times. You can also use System managed size.
* It is Recommended to use Initial and Maximum size same.
For Windows 7/Vista:
1) Right Click on “Computer” icon on desktop, then click “Properties”.
2) Click “Advance system settings”.
3) Click on “Advanced” tab, then click on “Settings” in performance section.
4) Click on “Advanced” tab, then click on “Change” in Virtual memory section. Now you should see the following screen.

5) Select the drive, then select Custom size, insert Initial and Maximum size, then click “Set”, now Click “OK”.
For Windows XP:
1) Right click on “My Computer”, then click on “Properties”.
2) Click on “Advanced” tab, then Click on “Settings” in Performance section.
3) Click on “Advanced” tab, then Click on “Change” in Virtual memory section.
4) Select the drive, then select Custom size, insert Initial and Maximum size, then click “Set”, now Click “OK”.
* Recommended size of Pagefile is Your RAM * 1.5 times. You can also use System managed size.
* It is Recommended to use Initial and Maximum size same.
Subscribe to:
Posts (Atom)